Turning a Wood Ball or Sphere Step by Step Method No Expensive Jig
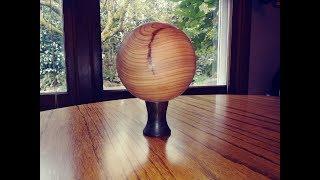
I show my Step by Step method of how to turn a wood ball.
This method is fool proof and simple. Only simple cuts needed.
I use standard wood turning tools and no jigs
I show my step by step methods to layout and cut a ball.
I use simple math to layout the lines to turn away.
This is a very accurate method to use. I used this method for years to round the corners on wood patterns I made for foundry use.
It is a very accurate way to do it plus you are actually turning it yourself and not using a jig to do it.
Plus Wood turning a ball is great practice.
The ball is made from Redwood.
If you found this video entertaining:
Please Like and Subscribe and Share if you are inclined
The video is for entertainment purposes only
Things I am interested in:
Segments Natural Edge Live Edge Bark
Madrone Burl
Segmented Turnings Glue Goblets Bowls
Lacquer Wipe on Poly Howard Feed and Wax
Wedgie Sled Wood Lathes segment glue up
Lathe turned bowl burls
Woodworking Carvings
Lathes
Dizzy bowls Twister
Tumbling bowls
Wing Bowls
Emerging Bowls
Asian Pear
Locust
Droop Bowl
Mushroom
Ball Sphere
Wood turning a wood ball or sphere
Тэги:
#wood_turning #woodturning #sphere_ball #natural_live_edge #droop_bowl_dizzy #segment_segmented #making_a_wood_ballКомментарии:

Nice video Gary. I really like the segmented ball.
Ответить
Sure understand not wanting to be a bad influence...thank you on your having a ball video...
Inspiring...thank you...

Awesome. You have a new subscriber. Will use this to show the kids that math can be fun.
Ответить
Well, you set the hook...I'm a follower. Thanks for the responses. I too have used patterns extensively in finish work on homes and all the way to stringed instrument building. I'd bet you have more old patterns laying around than I but they are great to keep in the files for future reference.
Ответить
Math is great. Thanks for sharing. Is the math the same regardless of the diameter? What was the wood and did you mount it in a spindle turning orientation?
Ответить
this may be the best reason ever to explain to my teenagers that yes, math actually is used later in life ..... awesome
Ответить
I've wanted to do a ball for ages, I'll try your method! Thanks for sharing Gary, perfectly explained!
Ответить
Nice job, I’ve been trying to do this so many times and seems like I’m chasing the sphere down to nothing, just gets smaller and smaller, it was how I mounted it on the lathe but seeing your video now I know how to do it , thanks
Ответить
I enjoyed your ball turning.. I want to try to turn a ball out of a crotch in a tree branch. I have turned a few bowls. Is there anything I need to be aware of with the grains I will encounter?
Ответить
what ball diameter in mm?
Ответить
Awesom! Thank you! I will try this.
Ответить
Excellent job. I'm just having a difficult time trying to figure out how to make a jig for my tailstock, that won't take much time. Your explanation was great, and I understand how to make the sphere, and i understand that you have to have the jig for your headstock, and tailstock to make it round. I'm just still trying to figure a way to make a jig for my tailstock, as I usually use a cone center on my tailstock, and I understand that I can't use that because it's too pointy and will indent the sphere.
Ответить
Thank you.
Ответить
Thank you How much do you charge for something like that
Ответить
Just found your video. Great explanation. Thankyou
Ответить
Just what i'm looking for TYVM!
Ответить
Love that you can use math to create a great work of art. This is my next project
Ответить
I'm a beginner, so excuse the silly question, but is it possible to turn a set of lawn green bowls on a lathe ?
Ответить
Hard? Only as hard as the wood.
Great video...you probably made Ernie Connover smile...kudos...

Subbed immediately. Love your calm demeanor. Well done.
I understand that the billiard ball turners of yore would turn a shallow, narrow channel on the centre line (your pencil line) of the cylinder before rotating through 90⁰. They would then reduce all the high spots down to this perfect circle.
BTW, the music you played is the best on YT.

I prefer using a jig to be more accurate.
Ответить
Your video was just what I needed, thanks! Yesterday and today I turned 4 spheres of increasing sizes (and made some cup chucks). By using your method they are all pretty darn round. Much more consistent than the one I did "by eye". I didn't need to buy any new jigs or make a template for each different size...just had to remember .414 and .26. I appreciate you sharing your wisdom!
Ответить
Great explanation and thanks for the maths lesson. I'ms going to give this method a go
Ответить
Cool! Done like a true pattern maker. While I find this all interesting, I think I would eye-ball the octagon, then do the rest by eye and the radius profile checker.
Ответить
"Wow/. I got lucky." 😎
I don't think luck had anything to do with it.
To turn a piece of wood to look like a sphere is not that tough. However, to turn a piece of wood so that it becomes a sphere of a predetermined diameter within close tolerances is a different matter altogether. For that one has to use geometry. In the workshop, geometry rules the day -- every day.
As I said. Luck had nothing to do with it.
Thanks for the video!

No wonder Phil calls you professor….Great work Gary i will try your method , thank you for sharing
Yiannis (Athens Greece)

Not for me I don't see any applications I could use , however I can see that you know your craft and you are a master of turning , so please don't think I don't appreciate the quality of your work I am definitely going to subscribe because I know you can teach and give me great ideas I look forward to watching more of your work .
Ответить
Gary, having turned a few spheres using a template, I have to ask if you are presenting this as just an option or do you think it makes getting to a sphere easier?
Ответить
amazing ! thanks for that !!
Ответить
Perfect! I've been watching several different people turning spheres to learn the different ways, and this one by far made more sense and seems so much easier than the others (no criticism to the other turners intended) I'm already excited for tomorrow to get in my workshop and try this method! Thank you for sharing and explaining it so well! Chris
Ответить
Excellent
Wonderful demonstration
Thanks 😊

Excellent study of making a ball. East to follow and very informative. You did a wonderful job!!
Ответить
Excellent demo. Can you please provide the formula for converting the measurements used to metric? I discovered to work out the cord length in metric, for example, you needed to convert 0 .414 " to mm (10.5) and then subtract that from the diameter measurement (e.g. 56mm) rather than multiple it as you did for the imperial measure. This clarification in your video would save a lot of time for those of us who are not really into maths! Thanks
Ответить
When you make your first cut, joining the 2 lines and make a 45 toward the tailstock, when/how did you mark the line on the tailstock end of the cylinder? I understand your math and method. Great video.
Ответить
Wowza! That turned into a beautiful art piece! So perfect and simplistically elegant! Fantastic job. Bravo!
Ответить
Lovely work. I turned some balls freehand on request of a friend recently and they wound up looking like the earth - longer diameter at equator than between the poles. But they fulfilled the purpose. Pity I had not seen your great tutorial beforehand. Very informative as usual. Greetings from Ireland.
Ответить
Thanks I needed that
Ответить
Thanks for sharing this method. I turned my first sphere today 👍
Ответить
Merci beaucoup ! 👍👏👏
Ответить
Thank you for passing on your knowledge and skill from years of experience. This video was fascinating, clear, and helpful.
Ответить
Hello Papa! I love your videos. I heard you say you used to be a wood pattern maker, is that correct? Did you make patterns for the airplane/aerospace industry? I have an old friend who is 93 years old who used to be a pattern maker here in San Diego doing just that. He worked for Solar Turbines and Convair after WWII. During the cold war era....
Ответить
Hello from Holland. My name is Jan. I was suprised to see you making a bal with only some lines with calculations. These video,s you make is an PLUS for us as hobby woodworkers. Many , many thanks for this explanation and sharing your knowledge in this matter. One question I have. You marked the last edges with a 5” round pice of wood on with you have made some dark so you can see the little differents that scraped away. Now, what dark did you put on these pieces? Greetings Jan 🌷🌷🌷
Ответить
Do you have a segment sphere video?
Ответить
Fantastic work I have learnt a lot I'm going to try it
Ответить
Great video, thank you. I'd bought a sphere turning jig thinking it would be quicker and easier but it's not! They take forever to setup and if you get it slightly wrong you end up with an egg shape, taking the time to learn how to turn one by hand with a few quick measurements and a good eye is time very well spent! I've tried the method by 'As wood turns' and got good results but I like your method. Great video and well explained....my sphere jig is going back on a well known auction site now!!
Ответить
you made that math easy to understand and I really appreciate that! So talented a turner and teacher! BRAVO!
Ответить


![BTS - Jeon Jungkook [전정국] Cover Playlist [2018] BTS - Jeon Jungkook [전정국] Cover Playlist [2018]](https://smotrel.cc/img/upload/TW9tRmFoSEVTTms.jpg)


