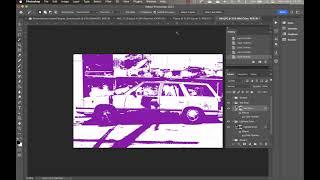
Posterization Steps in PS
How to posterize your photo image to create film separation using this non-destructive method to edit your adjustment layers. It will go over how to changing your color image to a high contrast, black, gray, and highlight areas, and how to use the blur filter to soften the image and reduce noise and details.
1. Separations for screen print needs to be printed to vellum/film 100% opacity in black.
2. Exposing photo emulsion with laser jet ink or special UV inkjet ink will block out areas which will wash out. UV light will harden the emulsion. Unexposed areas will wash out and create your stencil for your color layers.
3. When printing, the image should sit inside your vellum/film (Tabloid size 11x17"). Your image size should be no larger than 10x16". Resolution set to 300.
4. Print out each layer at 100% opacity, SELECT corner crop marks and use the "Screen Transparency" preset.
Тэги:
#Posterization #screenprint #printmakingКомментарии:
Posterization Steps in PS
Jennifer
Couch Session #26: "Black Horses" by The Yard | LIVE MUSIC PERFORMANCE
Three Crown Studio
Педали Caravangoes - Первый выезд! | iRacing
GrigArt Play
Guns & Ammo | Gunny | Gray Zone Warfare GUIDE | Quick/Solo | Mission Tutorial
TroubleChute Basics
Funny Times, Podcast & Leben - Luke Mockridge Interview
Webtalkshow - Exklusive Promi-Interviews
Basic computer course in Urdu
Green Learn Academy


